Monday, January 31, 2011

Concealer

I have always been a night owl so I tend to stay up late watching youtube videos, reading, or just handcrafting cards. I feel like I get a lot more done at night but man, oh man, I have horrible undereye bags. I get the dark, purple kind of bags- ugh! I currently use the Laura Mercier secret camouflouge concealer in SC2 and I love it. It works great on zits and dark spots but a little too thick for the under eye area. Since it is way to heavy for the undereye area, I am trying new concealers for that sensitive area. Recently, I picked up a concealer from Neutrogena. It sort of reminds me of Laura Mercier's Undercover Pot because it has that translucent setting powder also. LM's concealer is $34 while Neutrogena retails for around $10-$15. In the photos, I put Neutrogena's concealer on the left side of my face- including the undereye and on my sun spots as well as on my chin and side of nose. I think you can definitely see the difference. I also post close up photos of the right and left side of my face. Believe it or not, I have sun spots on both sides of my face on the upper cheek area. And both photos were taking in the same light with same flash option.


Here's a close up of my eyes. The left eye has concealer. I think the concealer makes my left eye look smaller. It looks funny but once I apply eyeshadows, I can play with colors to make my eyes look bigger. I also like how I can see a difference in how the concealer covers up darkness under my eyes. I feel this concealer goes on very smoothly and leaves little creasing.


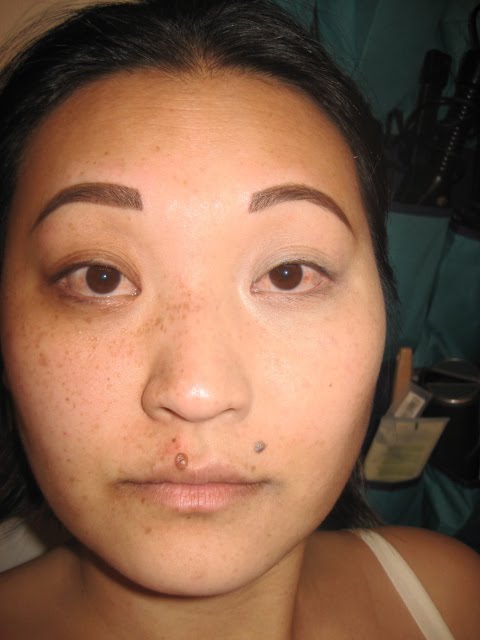
Here's me with concealer on left side and naked face on right side of face. I think here you can see more clearly how concealer makes my left eye seem smaller. I did apply the concealer under the eye and on top of my eyelid area.

Right side of face (no concealer)


Left side of face (concealer applied)


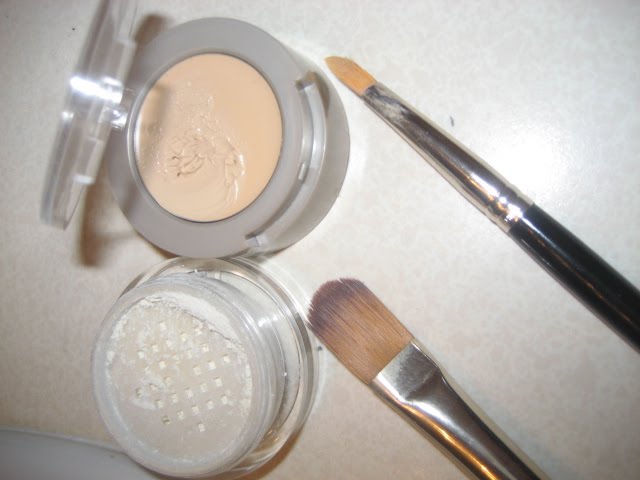
Neutrogena Mineral Sheers Concealer Kit with SPF 20 in shade Buff (9). Laura Mercier brushes.


So do you see a difference with the concealer? What concealer do you use for the undereye area?

Must READ! More CVS Haul

Hey Ladies- I just stopped by CVS and there are still lots of makeup for 75% off. But more importantly, when you buy $10 worth of Physician's Formula makeup, you get $7 extra rewards bucks back. So, basically, I bought makeup already 75% off then I got $7 back to use on other makeup. In this haul, I got my makeup for about 56% additional off the 75%. The percentage you get off is the total you pay so you obviously save more when you buy closest to the $10. See photos of my receipt and goods below! On the receipt, I wrote down how much the item essentially cost me once I calculated in the $7 rewards I got back. To get rewards you have to use your CVS card- to get your CVS card, you have to sign up for one- totally free! And remember to sign up for Beauty Club (separate application but also free). Everytime you spend $50 on makeup at CVS, you get $5 rewards bucks back (to be used like cash on anything in CVS).

Okay, enough CVS talk for tonight. But seriously, eyeliner for $0.68? You cannot beat that.

Side note, this blog detailed a lot more math than I'm used to. Seems like math only comes handy to me when calculating my makeup budget- lol!


From left to right with actual cost of item after savings- dark brown eye pencil- $0.68, face sculpting trio (i bought two- comes with highlighter, face powder, and bronzer and tiny angled brush)- $1.58, and pressed bronzer- $1.72

Tuesday, January 25, 2011

BLUSH


I love blush. I especially love pinky brown blushes with shimmer. Here's a photo of my blush stash. The top four cluster of blushes on the right in the top palette includes my Stila blushes. (The other cluster of pans in that top palette are MUFE eyeshadows). Below that is my Coastal Scents blush palette. Next to the palettes are my RnR blushes. Then as you come down towards the bottom of the photo comes MAC, two Illasmasque, NARS, one Bobbie Brown and three Paula Dorfs. Enjoy!

Monday, January 24, 2011

Eyebrows


Other than blush, the other makeup step I never miss is doing my eyebrows. Groomed eyebrows just make me look prepared for the day even if I didn't have time to brush my teeth. For the past ten years, I have relied on Benefit's Brow Zings (right). It's an amazing little product that comes with pigmented wax for shaping and natural-shaded powder for setting. The kit also includes discreet tweezers, mini hard angle brush, mini blending brush and mirror. After tweezing my brows for stray hairs, I apply some of the wax on to my eyebrows using the mini hard angle brush. Then using my own, long handled angle brush, I fill in the gaps on my brows with the powder using slow, angled strokes. I also use the powder to help shape my brows. Brow zings costs $30. Pricey but one kit will last me at least 6 months. ELF also carries a brow kit that I like (left). ELF's kit comes with a duo ended brush, wax and setting powder as well and it is $3. So definitely more affordable. I find that ELF's wax is more greasy than Benefits making it not as likely to keep powder in place as long as Benefits. Also, ELF's powder is more chalky than Benefits but ELF's kit is a more affordable alternative if you just need a little touch up now and then.


Some people also just use dark brown eyeshadow to fill in the gaps in their brows. I also know people who have thick brows so they just comb them into place with a brow gel. What do you use? Send your advice to me and I will post for others.

(Pictured here: My personal Brow Zings and ELF brow kits with two angled brushes I often use: silver Cargo eyeliner hard angled brush and white Benefit angled brush).

Tuesday, January 18, 2011

My Favorite Red Lipsticks


I grew up wearing deep burgundy lipsticks (ls). Those were the days of dark outlined lips and almost black red shades. I've since expanded my lipstick shades and especially love reds/oranges. I find those are actually the easiest colors to wear because I only wear it when I do barely nothing else to the rest of my face makeup. That's because red lipstick is so bold that neutral eyes and cheeks are most complimentary. Here are pics of my entire makeup/gloss stash and favorite reds/oranges. I keep my favorite shades in the upper right corner of my ls box for easy access. I also swatched the colors on the inside of my arm. I am NC30 in MAC for a point of skin tone reference. Also posted is a pic of me wearing Hotta Hotta orange ls by Paula Dorf- my current favorite bright shade. Try wearing a bright color if you usually go for that nude ls!


(Lipstick Colors from left to right)
Loreal Endless in 300: Crimson Joy (creamy, very pigmented, deep red burgundy color)
Rimmel Moisture Renew in 880: Rose Passion (light red, sheer color)
Paula Dorf: Holiday (warm red, somewhat sheer color)
Rimmel Lasting Finish Lipstick in 166: Temptation (true red, very pigmented and silky color)
Wet n Wild in 911D (true red, matte color)
Loreal Color Riche in 420: Mango Monarch (dark red-orange in sheer finish)
Loreal Endless in 730: Saucy Sangria (dark blood red color, full coverage, beautiful matte finish- my favorite red)
Revlon Colorburst in 080: Coral (light orange color, sheer finish)
Paula Dorf: Hotta Hotta (true orange color, deep pigmented, very powerful color- my favorite orange)

Rock and Republic- bogo free eyeshadows

All Rock and Republic Eye Shadow Shades...Buy 1 Get 1 Free. Limited Time Only! Enter "ROCKCOSMETICS" code at checkout for deal. Original price is $28 but sale price is $14 so you get two eyeshadows for $14! At $7 a pop- this is one good deal. You also get a pretty generous 3g per eyeshadow compared to 1.5 g in a single MAC eyeshadow (MAC cost is $14.50 per es). I have one RR eyeshadow in "Denim" and the color is super pigmented and true to what you see in the pan.

Monday, January 17, 2011

Creating Volume on Lashes


Who doesn't want full, volumnious lashes? Instead of going for expensive lash extensions or possibly unsafe lash serums, try this: I recently heard of this method of creating more volume on the lashes by applying one coat of mascara then dusting lashes with powder before applying second coat of mascara. Dusting on the powder was sort of odd but I did it with fluffy eyeshadow brush. I used generic face translucent powder. Here are the results. I noticed that my left eye, the eye with powder did look slightly more full. Even my boyfriend noticed and he knows nothing about makeup. The powder is supposed to cling to first coat of mascara so that when second coat of mascara is applied, it appears as though you're applying onto more lashes. Although this did not make my lashes look dramatically more full, the slight difference could make the extra step worth it. Try it and let me know what you think.

Depotting Loreal HIP Eyeshadows


Loreal HIP eyeshadows (es) are my favorite department store eyeshadows. You can find them at Walgreens, CVS, Walmart, pretty much anywhere. There are many shades to pick from and most of them are highly pigmented and true to color in the pot. I have been collecting these from a while back and while I love them, storing them can be a bit cumbersome since the packaging is sorta big. The es comes in a round pot with duo shades on one side and a little sponge applicator and mirror on the other side. The mirror side to me is totally useless. I decided to depot these es for better storage. I stored them in an old flap top cardboard box (originally held my stella perfume roller balls). Some people use CD cases or those flat tin boxes. To depot, I used a candle to warm up the bottom of the pot. ES are normally glued down so warmth will loosen the es and allow you to pry them out in their pan into your chosen storage container. I've also tried an embossing tool which works great because there's no fumes to deal with. Some people also use a lighter. You definitely want to be in a well ventilated space when doing this. I pried my es out with the flat part of a hair clip. You could also use very flat tweezers or butter knife. I've tried with exacto knife but the exacto knife was too flimsy for the gaps and broke on me- pretty dangerous. Anyways, the final project turned out really good. I peeled off the es labels and glued them on the box coinciding with the colors. There was enough glue on the es pans themselves so I just stuck them into box with no further gluing. If you depot or plan to, send me some pics. Have fun!

Saturday, January 8, 2011

Makeover Saturday

Cua (right) and Sully (left) came over this morning and let me do their makeup for the day. We had lots of fun with the fake eyelashes although I am not that happy with how I applied Cua's. Hopefully they stay on for at least a few hours. Both wore the eye colors so well. I especially love the purple on Cua and pinky/blue shades in Sully's crease. The colors do not show up at all on the photo but in person it was lovely. Thanks ladies for a great Makeover Saturday. Come anytime!


Friday, January 7, 2011

Harley Photo Shoot!

Last summer, I did makeup for a photo shoot featuring models on Harley motorcycles for a Harley Davidson Calendar. In exchange for my complimentary makeup work, I recieved professional photos for my portfolio. I had tons of fun and it was actually really exhausting doing makeup for 2-3 girls a day. Here are some photos of the models I worked on. Unfortunately, I don't have before pics but all these ladies were lovely natural beauties when I began working with them. Since this was a bikini shoot, I didn't want to go overboard with crazy colors. I tried to do sultry, smoky looks on all of them but just used different colors to highlight each model's features and personality. Enjoy!


Monday, January 3, 2011

CVS Makeup Sale- up to 75% off


My latest haul- all this for $113! Love the Physician's Formula Bronze Booster- the packaging is so cute. I also stocked up on Loreal HIP Liquid Lipcolors. In Madison, there are two CVS- one off Bedford near the Capital and one in Middleton. Check out the sale and let me know what you get!